NGINX as UDP Load Balancer
In this chapter we’ll use Nginx as UDP Load Balancer.
Intro
When you need load balance your UDP services such as DNS or NTP are few load balancer that support UDP. In previous jobs we used HAProxy as Load Balance but it doesn’t support UDP. This is why we are going to use Nginx. There is a project called PEN which also support UDP load balance and maybe I am going to prepare a document using PEN later.
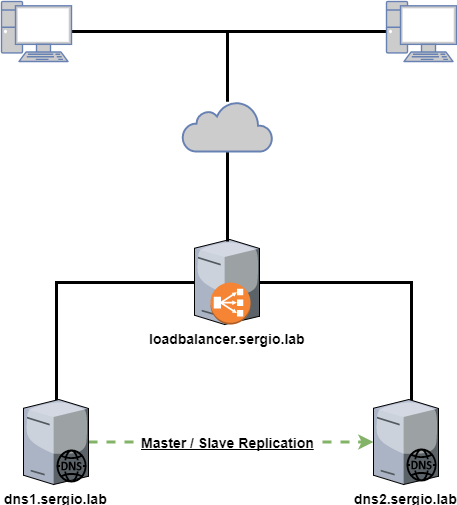
Scheme

The first step is configure our DNS
The host dns1.sergio.lab is the master DNS and dns2.sergio.lab our slave.
This is the configuration in dns1.
[root@dns1 ~]# cat /etc/named.conf
//
// named.conf
//
// Provided by Red Hat bind package to configure the ISC BIND named(8) DNS
// server as a caching only nameserver (as a localhost DNS resolver only).
//
// See /usr/share/doc/bind*/sample/ for example named configuration files.
//
// See the BIND Administrator's Reference Manual (ARM) for details about the
// configuration located in /usr/share/doc/bind-{version}/Bv9ARM.html

options {
        listen-on port 53 { 10.0.2.15; };
        listen-on-v6 port 53 { ::1; };
        directory       "/var/named";
        dump-file       "/var/named/data/cache_dump.db";
        statistics-file "/var/named/data/named_stats.txt";
        memstatistics-file "/var/named/data/named_mem_stats.txt";
        allow-query     { any; };

        /*
         - If you are building an AUTHORITATIVE DNS server, do NOT enable recursion.
         - If you are building a RECURSIVE (caching) DNS server, you need to enable
           recursion.
         - If your recursive DNS server has a public IP address, you MUST enable access
           control to limit queries to your legitimate users. Failing to do so will
           cause your server to become part of large scale DNS amplification
           attacks. Implementing BCP38 within your network would greatly
           reduce such attack surface
        */
        recursion yes;

        dnssec-enable yes;
        dnssec-validation yes;

        /* Path to ISC DLV key */
        bindkeys-file "/etc/named.iscdlv.key";

        managed-keys-directory "/var/named/dynamic";

        pid-file "/run/named/named.pid";
        session-keyfile "/run/named/session.key";
};

logging {
        channel default_debug {
                file "data/named.run";
                severity dynamic;
        };
};

zone "." IN {
        type hint;
        file "named.ca";
};

include "/etc/named.rfc1912.zones";
include "/etc/named.root.key";

acl secondary-servers {
        10.0.2.16;
};

zone "sergio.lab" IN {
        type master;
        file "sergio.lab.db";
        notify yes;
        allow-transfer { secondary-servers; };
};
And I added a few Resource Records to the sergio.lab.db
[root@dns1 ~]# cat /var/named/sergio.lab.db
@  IN  SOA  dns1.sergio.lab.  hostmaster.sergio.lab. (
       201708043  ; serial
       3600       ; refresh after 1 hour
       3600        ; retry after 1 hour
       604800      ; expire after 1 week
       3600 )     ; minimum TTL of 1 hour

          IN  NS     dns1.sergio.lab.
          IN  NS     dns2.sergio.lab.
dns1      IN  A      10.0.2.15
dns2      IN  A      10.0.2.16
loadbalancer    IN      A       10.0.2.17
client1 IN      A       10.0.2.18
systemctl enable named
systemctl start named
firewall-cmd --permantent --add-service=dns && firewall-cmd --reload
In the secondary DNS (dns2.sergio.lab) our named.conf should look like this.
[root@dns2 ~]# cat /etc/named.conf
//
// named.conf
//
// Provided by Red Hat bind package to configure the ISC BIND named(8) DNS
// server as a caching only nameserver (as a localhost DNS resolver only).
//
// See /usr/share/doc/bind*/sample/ for example named configuration files.
//
// See the BIND Administrator's Reference Manual (ARM) for details about the
// configuration located in /usr/share/doc/bind-{version}/Bv9ARM.html

options {
        listen-on port 53 { 10.0.2.16; };
        listen-on-v6 port 53 { ::1; };
        directory       "/var/named";
        dump-file       "/var/named/data/cache_dump.db";
        statistics-file "/var/named/data/named_stats.txt";
        memstatistics-file "/var/named/data/named_mem_stats.txt";
        allow-query     { any; };

        /*
         - If you are building an AUTHORITATIVE DNS server, do NOT enable recursion.
         - If you are building a RECURSIVE (caching) DNS server, you need to enable
           recursion.
         - If your recursive DNS server has a public IP address, you MUST enable access
           control to limit queries to your legitimate users. Failing to do so will
           cause your server to become part of large scale DNS amplification
           attacks. Implementing BCP38 within your network would greatly
           reduce such attack surface
        */
        recursion yes;

        dnssec-enable yes;
        dnssec-validation yes;

        /* Path to ISC DLV key */
        bindkeys-file "/etc/named.iscdlv.key";

        managed-keys-directory "/var/named/dynamic";

        pid-file "/run/named/named.pid";
        session-keyfile "/run/named/session.key";
};

logging {
        channel default_debug {
                file "data/named.run";
                severity dynamic;
        };
};
masters master-ips { 10.0.2.15; };
zone "." IN {
        type hint;
        file "named.ca";
};

include "/etc/named.rfc1912.zones";
include "/etc/named.root.key";

zone "sergio.lab" IN {
        type slave;
        file "slaves/sergio.lab.db";
        masterfile-format text;
        masters { master-ips; };
};
In this configuration our dns2.sergio.lab acts as slave DNS.
As we made it in the dns1, we need to activate the service.
systemctl enable named
systemctl start named
firewall-cmd --permantent --add-service=dns && firewall-cmd --reload
After that, we have to configure our load balancer (loadbalancer.sergio.lab)
yum install epel-release -y
[root@loadbalancer ~]# cat /etc/yum.repos.d/nginx.repo
[nginx]
name=nginx repo
baseurl=http://nginx.org/packages/mainline/centos/7/$basearch/
gpgcheck=0
enabled=1
yum install -y nginx
Then configure nginx.conf for load balance.
mv /etc/nginx/conf.d/default.conf /etc/nginx/conf.d/default.conf.bkp
Add these lines to file /etc/nginx/nginx.conf
stream {
    upstream dns_servers {
        server 10.0.2.15:53 fail_timeout=60s; # IP of dns1.sergio.lab
        server 10.0.2.16:53 fail_timeout=60s; # IP of dns2.sergio.lab
    }

    server {
        listen 53  udp;
        listen 53; #tcp
        proxy_pass dns_servers;
        error_log  /var/log/nginx/dns.log info;
        proxy_responses 1;
        proxy_timeout   1s;
    }
}
With this configuration the load balance is Round Robin.
If you have selinux activated the service won’t start because nginx can not bind port 53. To allow this, issue this command
check your selinux status with sestatus command
ausearch -c 'nginx' --raw | audit2allow -M my-nginx
semodule -i my-nginx.pp
Now you can enable and run nginx
systemctl enable nginx
systemctl start nginx
firewall-cmd --permantent --add-service=dns && firewall-cmd --reload
You can check you configuration using dig
dig @loadbalancer client1.sergio.lab
With these configurations you made a DNS Load Balancer using nginx and bind. This configuration allows you to have several dns servers or ntp servers behind a load balancer and you have high availability for critical services.