LDAP + Active Directory Configuration Part 2
In this section we are going to cover:
- 389-Directory Server Setup
- Configure TLS for secure connections with self signed certificate
- Configure unauthenticated binds
- Replication Master Single
Now you have fully authenticated Linux servers against Active Directory as indicated in Part 1, now it’s time to install 389 Directory Server
389-Directory Server Setup
Now install the EPEL repo.
yum install -y epel-release.noarch
Now install the following packages
yum install 389-ds-base 389-admin 389-console 389-ds-console 389-admin-console -y
After that configure the file descriptor parameter
vim /etc/sysconfig/dirsrv.systemd
[Service]
LimitNOFILE=8192
Now, run the /usr/sbin/setup-ds-admin.pl to complete the installation
==============================================================================
This program will set up the 389 Directory and Administration Servers.

It is recommended that you have "root" privilege to set up the software.
Tips for using this program:
  - Press "Enter" to choose the default and go to the next screen
  - Type "Control-B" then "Enter" to go back to the previous screen
  - Type "Control-C" to cancel the setup program

Would you like to continue with set up? [yes]:
==============================================================================
Your system has been scanned for potential problems, missing patches,
etc.  The following output is a report of the items found that need to
be addressed before running this software in a production
environment.

389 Directory Server system tuning analysis version 14-JULY-2016.

NOTICE : System is x86_64-unknown-linux3.10.0-123.el7.x86_64 (1 processor).

NOTICE : The net.ipv4.tcp_keepalive_time is set to 7200000 milliseconds
(120 minutes).  This may cause temporary server congestion from lost
client connections.

WARNING: There are only 1024 file descriptors (soft limit) available, which
limit the number of simultaneous connections.

WARNING  : The warning messages above should be reviewed before proceeding.

Would you like to continue? [no]:
==============================================================================
Choose a setup type:

   1. Express
       Allows you to quickly set up the servers using the most
       common options and pre-defined defaults. Useful for quick
       evaluation of the products.

   2. Typical
       Allows you to specify common defaults and options.

   3. Custom
       Allows you to specify more advanced options. This is
       recommended for experienced server administrators only.

To accept the default shown in brackets, press the Enter key.

Choose a setup type [2]:
==============================================================================
Enter the fully qualified domain name of the computer
on which you're setting up server software. Using the form
<hostname>.<domainname>
Example: eros.example.com.

To accept the default shown in brackets, press the Enter key.

Warning: This step may take a few minutes if your DNS servers
can not be reached or if DNS is not configured correctly.  If
you would rather not wait, hit Ctrl-C and run this program again
with the following command line option to specify the hostname:

    General.FullMachineName=your.hostname.domain.name

Computer name [ds1.sergio.lab]:
==============================================================================
The servers must run as a specific user in a specific group.
It is strongly recommended that this user should have no privileges
on the computer (i.e. a non-root user).  The setup procedure
will give this user/group some permissions in specific paths/files
to perform server-specific operations.

If you have not yet created a user and group for the servers,
create this user and group using your native operating
system utilities.

System User [dirsrv]:
System Group [dirsrv]:
==============================================================================
Server information is stored in the configuration directory server.
This information is used by the console and administration server to
configure and manage your servers.  If you have already set up a
configuration directory server, you should register any servers you
set up or create with the configuration server.  To do so, the
following information about the configuration server is required: the
fully qualified host name of the form
<hostname>.<domainname>(e.g. hostname.example.com), the port number
(default 389), the suffix, the DN and password of a user having
permission to write the configuration information, usually the
configuration directory administrator, and if you are using security
(TLS/SSL).  If you are using TLS/SSL, specify the TLS/SSL (LDAPS) port
number (default 636) instead of the regular LDAP port number, and
provide the CA certificate (in PEM/ASCII format).

If you do not yet have a configuration directory server, enter 'No' to
be prompted to set up one.

Do you want to register this software with an existing
configuration directory server? [no]:
==============================================================================
Please enter the administrator ID for the configuration directory
server.  This is the ID typically used to log in to the console.  You
will also be prompted for the password.

Configuration directory server
administrator ID [admin]:
Password:
Password (confirm):
==============================================================================
The information stored in the configuration directory server can be
separated into different Administration Domains.  If you are managing
multiple software releases at the same time, or managing information
about multiple domains, you may use the Administration Domain to keep
them separate.

If you are not using administrative domains, press Enter to select the
default.  Otherwise, enter some descriptive, unique name for the
administration domain, such as the name of the organization
responsible for managing the domain.

Administration Domain [sergio.lab]:
==============================================================================
The standard directory server network port number is 389.  However, if
you are not logged as the superuser, or port 389 is in use, the
default value will be a random unused port number greater than 1024.
If you want to use port 389, make sure that you are logged in as the
superuser, that port 389 is not in use.

Directory server network port [389]:
==============================================================================
Each instance of a directory server requires a unique identifier.
This identifier is used to name the various
instance specific files and directories in the file system,
as well as for other uses as a server instance identifier.

Directory server identifier [ds1]:
==============================================================================
The suffix is the root of your directory tree.  The suffix must be a valid DN.
It is recommended that you use the dc=domaincomponent suffix convention.
For example, if your domain is example.com,
you should use dc=example,dc=com for your suffix.
Setup will create this initial suffix for you,
but you may have more than one suffix.
Use the directory server utilities to create additional suffixes.

Suffix [dc=sergio, dc=lab]:
==============================================================================
Certain directory server operations require an administrative user.
This user is referred to as the Directory Manager and typically has a
bind Distinguished Name (DN) of cn=Directory Manager.
You will also be prompted for the password for this user.  The password must
be at least 8 characters long, and contain no spaces.
Press Control-B or type the word "back", then Enter to back up and start over.

Directory Manager DN [cn=Directory Manager]:
Password:
Password (confirm):
==============================================================================
The Administration Server is separate from any of your web or application
servers since it listens to a different port and access to it is
restricted.

Pick a port number between 1024 and 65535 to run your Administration
Server on. You should NOT use a port number which you plan to
run a web or application server on, rather, select a number which you
will remember and which will not be used for anything else.

Administration port [9830]:
==============================================================================
The interactive phase is complete.  The script will now set up your
servers.  Enter No or go Back if you want to change something.

Are you ready to set up your servers? [yes]: **ENTER**
Creating directory server . . .
Your new DS instance 'ds1' was successfully created.
Creating the configuration directory server . . .
Beginning Admin Server creation . . .
Creating Admin Server files and directories . . .
Updating adm.conf . . .
Updating admpw . . .
Registering admin server with the configuration directory server . . .
Updating adm.conf with information from configuration directory server . . .
Updating the configuration for the httpd engine . . .
Starting admin server . . .
The admin server was successfully started.
Admin server was successfully created, configured, and started.
Exiting . . .
Log file is '/tmp/setupy75GD8.log'
Ensure your services will run after reboot
systemctl enable dirsrv.target dirsrv@ds1.service dirsrv-admin.service
systemctl start dirsrv.target dirsrv@ds1.service dirsrv-admin.service
Open your firewall for ldap and ldaps
firewall-cmd --permanent --add-service=ldap
firewall-cmd --permanent --add-service=ldaps
firewall-cmd --reload
note: Repeat these steps in the second server (ds2.sergio.lab)
Create LDAP Users
First of all, we will create users with the same user ID as Active Directory domain, we can check with the id command, in my case I have two users. I will add users in the primary server, then with replication both server will have the users.
id sgonzalez
uid=972801108(sgonzalez) gid=972800513(domain users) grupos=972800513(domain users),972800572(denied rodc password replication group),972801115(critical servers & storage),972800512(domain admins)

id mgonzalez
uid=972801112(mgonzalez) gid=972800513(domain users) grupos=972800513(domain users)
You can add user into LDAP via command line (ldapmodify -a) or GUI, I use GUI (Grahical User Interface).
note: For GUI you need java-1.8.0-openjdk and complete Server X installed in your system
Run the following command
389-console -a http://ds1.sergio.lab:9830
Enter the Directory Manager credentials
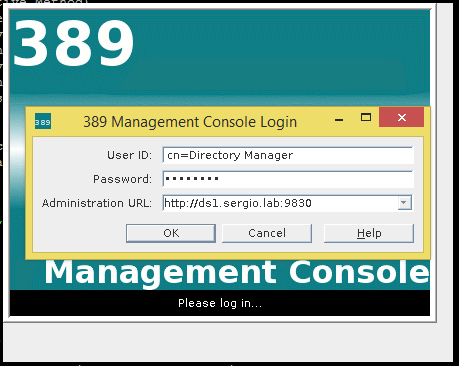
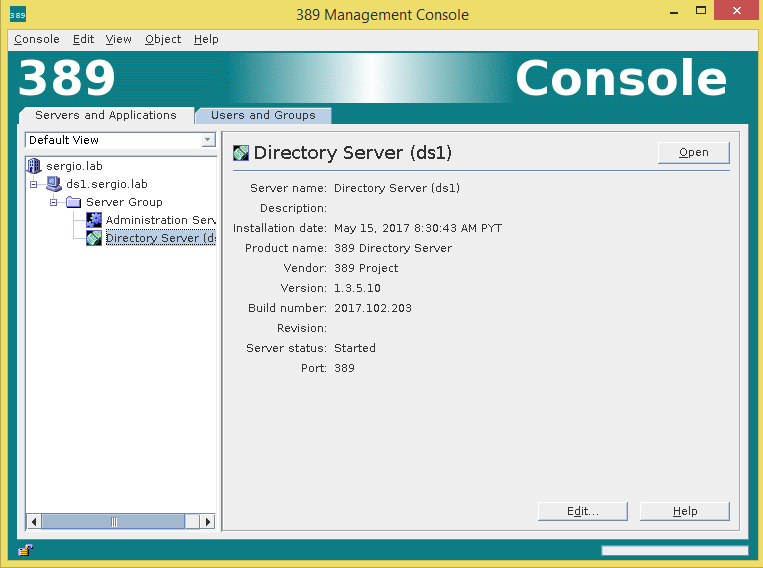
Now “Open” the section of Directory Server
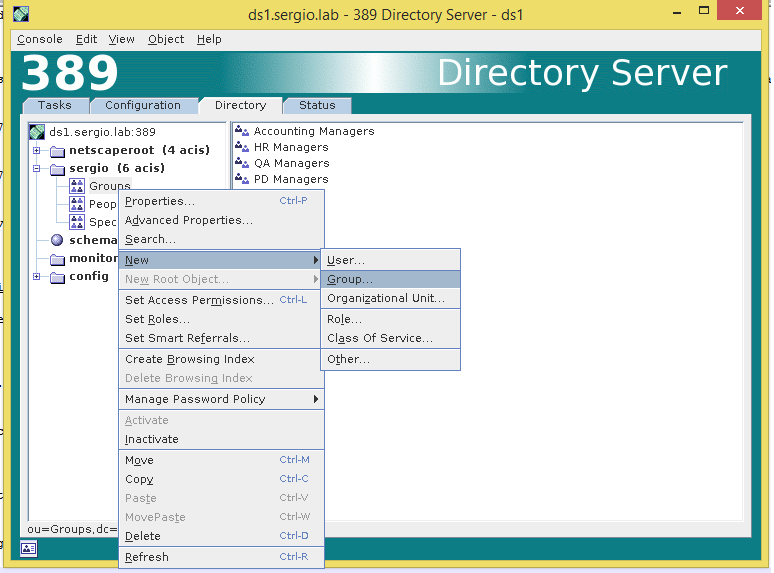
In the Directory Tab, add the group and then the user
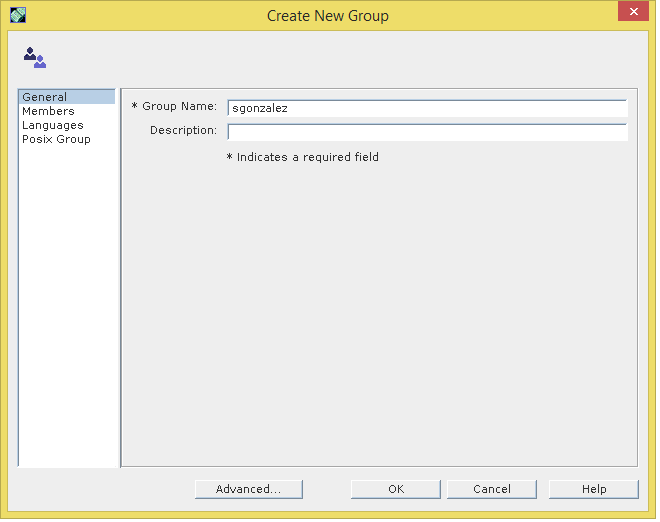
Complete the Group name and the Group ID

Now complete the user information, User ID and Posix information related.
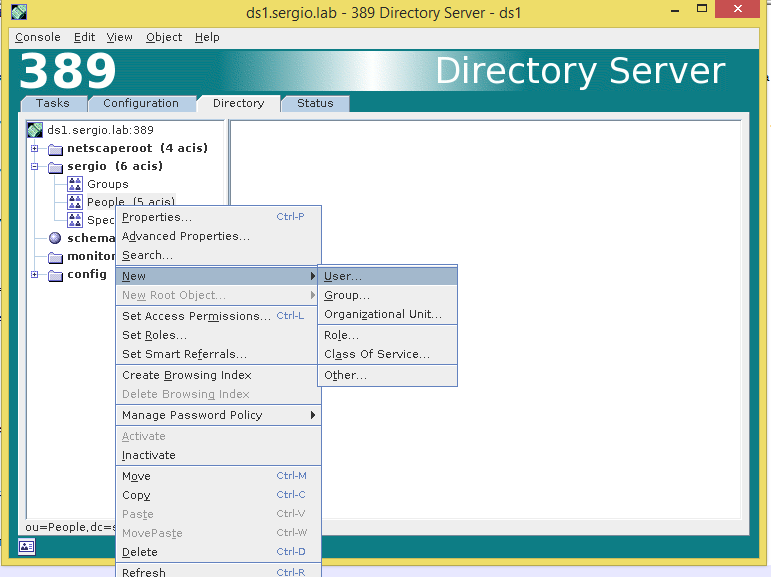

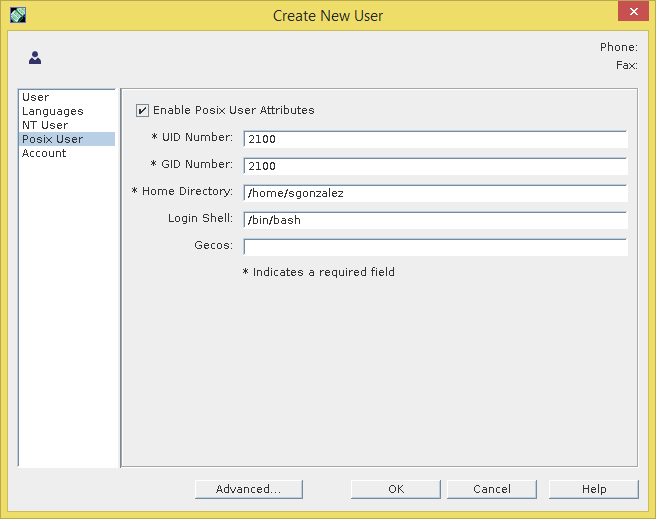
Now we have the user information, as you can see the password field is empty this is because we are going to recover the password from the Active Directory with the Plugin PAM Passthrough
Configuring Certificates
Our 389 Directory Server is up and running, now we must configure certificates so our Linux clients can log in against Directory Server. In this approach we don’t use a Certificate Authority instead we’ll act as a Certificaty Authority (CA) signing our certificate in the same server.
 cd /etc/dirsrv/slapd-ds1/
 vim pwdfile.txt
 aStrongPasswordHere
Create a new certificate database
certutil -N -d . -f pwdfile.txt
Create de CA Certificate
 certutil -S -n "CA certificate" -s "cn=CA Server,dc=sergio,dc=lab" -x -t "CT,," -m 1000 -v 120 -d . -f pwdfile.txt -2
 Generating key. This may take a few moments...
Is this a CA certificate [y/N]? y
Enter the path length constraint, enter to skip [<0 for unlimited path]: >
Is this a critical extension [y/N]? y
Now we create the Server Cert which the issuer CA is the previous created
certutil -S -n "Server-Cert" -s "cn=ds1.sergio.lab" -c "CA certificate" -t "u,u,u" -m 1001 -v 120 -d . -k rsa -f pwdfile.txt
Now export the CA certificate, which clients will verify to create a secure connection TLS/SSL. This is typically copied to /etc/openldap/cacerts/
certutil -d . -L -n "CA certificate" -a > cacert.pem
Now it’s time to set correct permissions
chown dirsrv:dirsrv key3.db cert8.db pwdfile.txt
chmod 640 key3.db cert8.db pwdfile.txt
Now we must activate the certificates, in the Directory Server window go Configuration -> Encryption -> Enable SSL for this server -> Use this cipher family: RSA -> Allow client authentication and Save
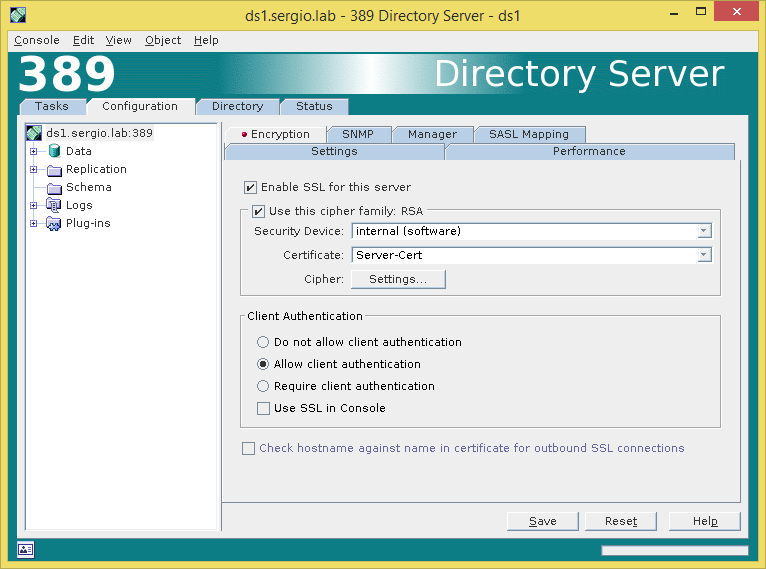
We need to configure the pin file, this file prevents enter the password during restart the service and need the password configured in the pwdfile.txt
cd /etc/dirsrv/slapd-ds1
vim pin.txt
Internal (Software) Token:aStrongPasswordHere
systemctl restart dirsrv.target
Now our server ds1.sergio.lab is listening the 636 port for secure connections.
In the second server (ds2.sergio.lab) we need to import the CA certificate.
To achieve this we need copy the cacert.pem file created to second server.
scp /etc/dirsrv/slapd-ds1/cacert.pem ds2.sergio.lab:/root
In the second server run the following commands
cd /etc/dirsrv/slapd-ds2/
 vim pwdfile.txt
 aStrongPasswordHere
certutil -N -d . -f pwdfile.txt
certutil -d . -A -n "CA certificate" -a -i /root/cacert.pem -t "CT,," -f pwdfile.txt
Create a request certificate
certutil -R -a -o ds2.csr -k rsa -s "cn=ds2.sergio.lab" -t "u,u,u" -m -v 48 -d . -8 ldap.sergio.lab -f pwdfile.txt
Copy the ds2.csr to the primary server.
scp /etc/dirsrv/slapd-ds2/ds2.csr ds1.sergio.lab:/root
In the primary server execute sign the request.
  cd /etc/dirsrv/slapd-ds1
 [root@ds1 slapd-ds1]# certutil -C -m 12345 -i /root/ds2.csr  -o /root/ds2.pem -a -c "CA certificate" -d . -f pwdfile.txt
now copy to secondary server the file ds2.pem
scp /root/ds2.csr ds2.sergio.lab:/root
In the secondary server install the certificate
certutil -d . -A -n "Server-Cert" -a -i /root/ds2.pem -t "u,u,u" -f pwdfile.txt
Repeat the process in the GUI to activate encryption and create the pin.txt file, as followed above.
Configure unauthenticated binds
This setup is recommended in secure environment like behind a firewall, in a local network. This feature allows you to connect to our ldap without a password. Now run the following command
ldapmodify -x -H ldap://localhost -D "cn=Directory Manager" -W
Enter LDAP Password:
dn: cn=config
changetype: modify
replace: nsslapd-allow-unauthenticated-binds
nsslapd-allow-unauthenticated-binds: on
To exit this command press CTRL-D
Replication Master Single
The replication process copy one LDAP Database to another LDAP Database located in other server. To achieve this we have several types of replication but in this time we’ll use Master Single Replication which means that a primary server have a Read-Write database (supplier) and other server acts as Read-Only database (consumer).
First, we need to create a SUPPLIER BIND DN ENTRY in the consumer server, in our case on the ds2.sergio.lab
systemctl stop dirsrv.target
vim /etc/dirsrv/slapd-ds2/dse.ldif
Add this lines at the end
dn: cn=replication manager,cn=config
objectClass: inetorgperson
objectClass: person
objectClass: top
cn: replication manager
sn: RM
userPassword: password
passwordExpirationTime: 20380119031407Z
nsIdleTimeout: 0
systemctl start dirsrv.target
Now connect to the Supplier console (ds1.sergio.lab), go to Directory Server Administration -> Configuration -> Replication, Enable the changelog and Save.
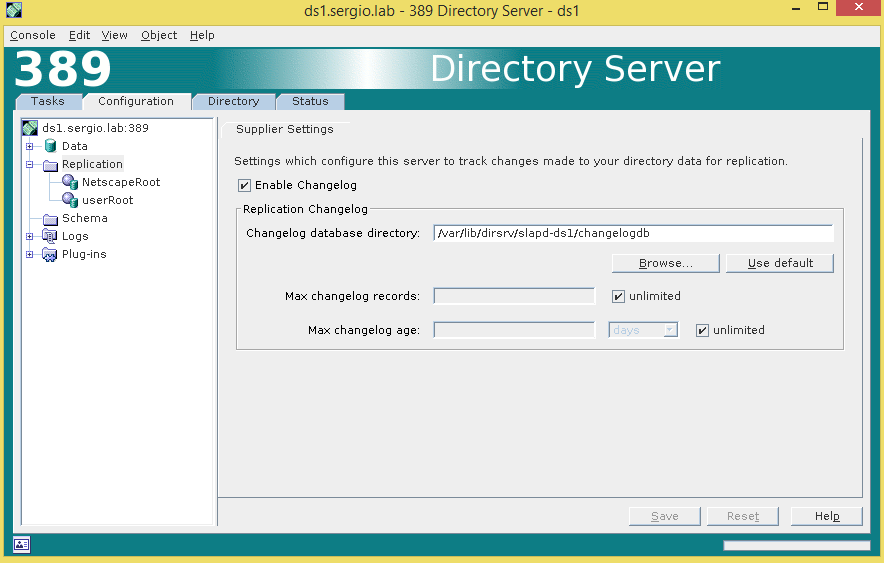
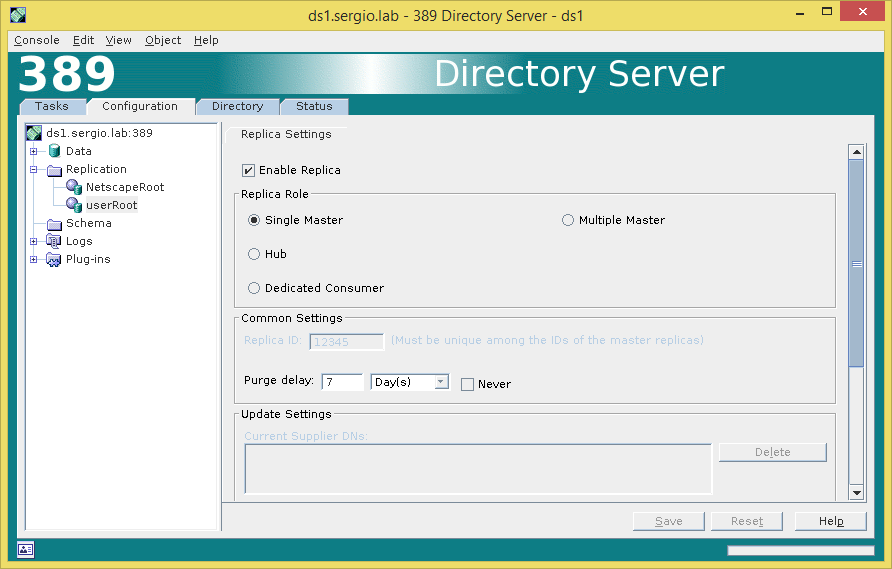
In the navigation tree on the Configuration tab, expand the Replication node, and select the database to replicate, UserRoot is the database who has user information. Now enable the replica as follow.
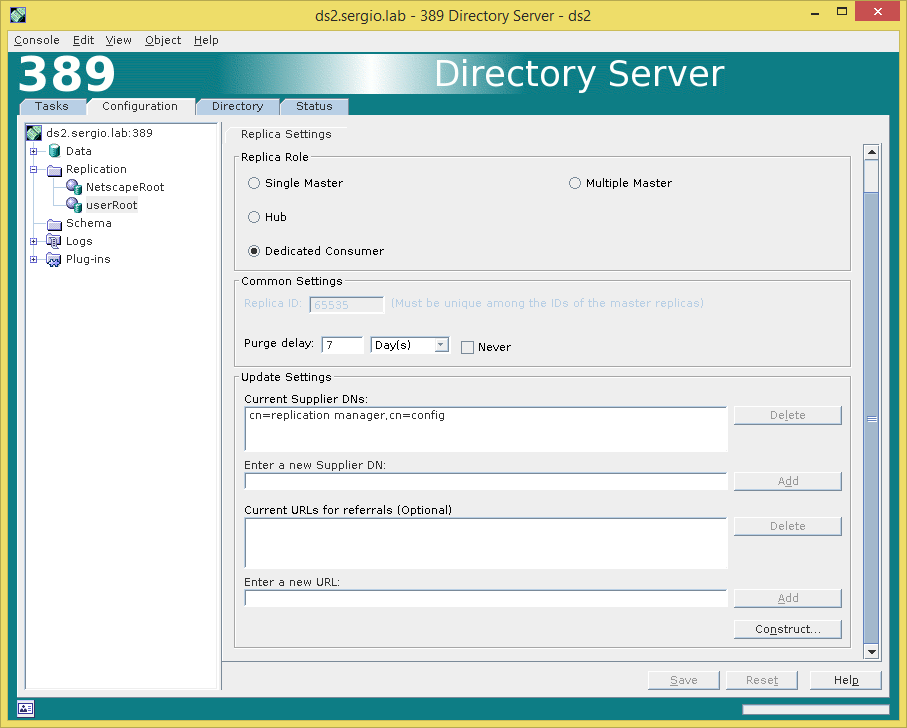
Ok, now go on the consumer server ds2.sergio.lab and select the Configuration tab, expand replication and select the database replica (UserRoot). Now enable replica as Dedicated consumer and add the supplier bind dn.
Now we need to create a Replication Agreement in ds1.sergio.lab (Supplier).
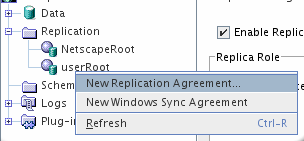
In the Configuration tab, right-click the userRoot database and select New Replication Agreement
Next write a Name and Description.
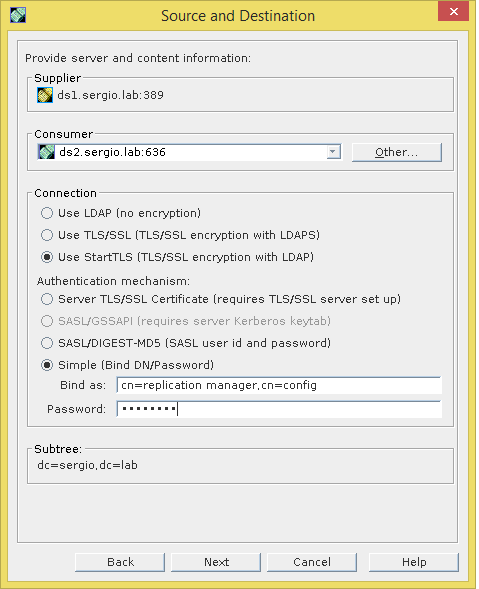
Next complete as follow, with the supplier bind information.
Uncheck Fractional Replication, we do not use it.
Set always in sync.
Check Initialize consumer now, this will try to copy the database to consumer.
![]()
Then will show a Summary and will begin the synchronization.
After that you can check the process by looking the replication agreement.
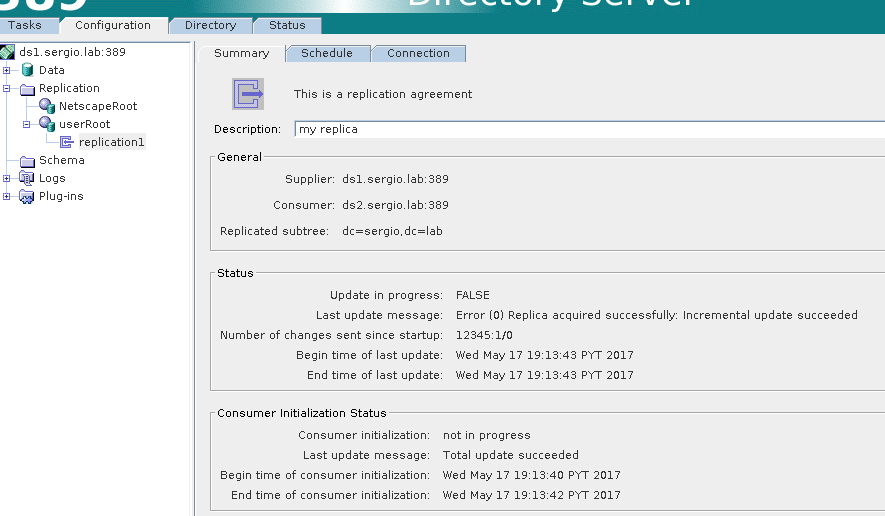
If you reached at this point means you are very patience and you have a full ldap with replication, now remember, all your changes must be done in the supplier server (ds1.sergio.lab) because is the read-write replica.
In the next part we will cover the load balance between ldap servers, configuration of PAM Passthrough and configuration of the linux clients. See you on the flipside ![]()
References:
- Directory Server Replication
- man certutil
Your thoughts and suggestions are always welcome, please feel free to comment or ask questions if you need a hand.