Partition resize in a virtual disk

Intro
Always Sometimes you need resize a partition in a LVM (Logical Volume Manager) but the common solution is adding a new disk to VG (Volume Group). That’s OK but in the next time you will need a new resize and then new resize and so on, and you will have lots of disks per Virtual Machine and that is very difficult to handle when you need to delete some disk for example. The best approach is to take advantage of virtualization. In this guide I am going to show you how to resize a partition in a virtual disk which is using by PostgreSQL and simulate an SQL insert which should be always up because this procedure do not require a downtime.
Warning, if you not follow this guide as described may result in loss of data, please be sure to practice first in a lab environment before doing it in a production environment.
The environment
- Operating System: Centos 7
- Database: PostgreSQL 9.6
- Physical Volume: /dev/sdb1
- Volume group: pgdatavg
- Logical volume: pgdatalv
- Postgres Filesystem: /pgdata/
- Current size: 6.00g
- Filesystem: xfs
[root@test-pp /]# pvs
  PV         VG       Fmt  Attr PSize  PFree
  /dev/sda2  rootvg   lvm2 a--  19.51g    5.43g
  /dev/sdb1  pgdatavg lvm2 a--   6.00g       0
[root@test-pp /]# vgs
  VG       #PV #LV #SN Attr   VSize  VFree
  pgdatavg   1   1   0 wz--n-  6.00g       0
  rootvg     1   5   0 wz--n- 19.51g    5.43g
[root@test-pp /]# lvs
  LV        VG       Attr       LSize Pool Origin Data%  Meta%  Move Log Cpy%Sync Convert
  pgdatalv  pgdatavg -wi-ao---- 6.00g
  homelv    rootvg   -wi-ao---- 1.00g
[root@test-pp /]# df -h /pgdata/
Filesystem                     Size  Used Avail Use% Mounted on
/dev/mapper/pgdatavg-pgdatalv  6.0G   78M  6.0G   2% /pgdata
My database is for test only and I created a new one called test1 with a dummy table called mytest. In another console I execute the following to simulate load:
[postgres@test-pp ~]$ while :; do psql -d test1 -c "insert into mytest values ('test')" ; sleep 1 ; done
INSERT 0 1
This command will insert a new tuple every second.
Resize the partition
Now I will resize the partition, first I need to found the disk in the Virtual Machine, the /dev/sdb is connected in the following controller.
[root@test-pp /]# dmesg | grep -i sdb
[    1.273247] sd 0:0:1:0: [sdb] 12582912 512-byte logical blocks: (6.44 GB/6.00 GiB)
[    1.273265] sd 0:0:1:0: [sdb] Write Protect is off
[    1.273267] sd 0:0:1:0: [sdb] Mode Sense: 61 00 00 00
[    1.273283] sd 0:0:1:0: [sdb] Cache data unavailable
[    1.273285] sd 0:0:1:0: [sdb] Assuming drive cache: write through
[    1.274747]  sdb:
[    1.274897] sd 0:0:1:0: [sdb] Attached SCSI disk
The 0:0:1:0: indicate this disk is connected to controller 0 and the disk number is 1.
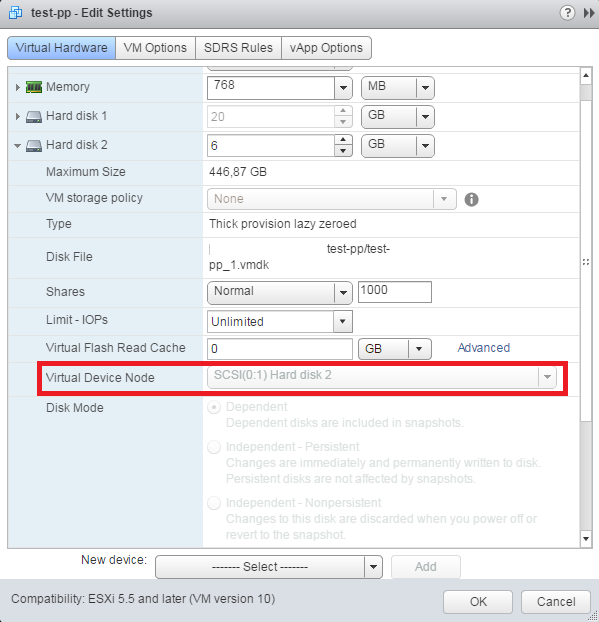
In the Vcenter you will see this in the Virtual Device Node, in Edit Settings window.

Now we identified the disk, in my case is Hard disk 2, and we expand the disk 2 GB more.
In this time we restart the scsi device with this command. This is because the Virtual Machine do not recognize the new size.
ls /sys/class/scsi_device/
echo "1" > /sys/class/scsi_device/0\:0\:1\:0/device/rescan
Remember, the scsi device is 0:0:1:0 as showed before with the dmesg command.
Now the dmesg command reflect the change
dmesg | grep -i sdb
[434507.999145] sd 0:0:1:0: [sdb] 16777216 512-byte logical blocks: (8.58 GB/8.00 GiB)
[434507.999338] sdb: detected capacity change from 6442450944 to 8589934592
Now it’s time to re-create the partition in the same fdisk interactive console, you need first delete the partition and then create the partition with the full size as follow. Also you need set the partition type as LVM. These steps are very dangerous, if you omit these steps you can loss data. Proceed the re-creation in the same fdisk console without exiting.
[root@test-pp /]# fdisk /dev/sdb
Welcome to fdisk (util-linux 2.23.2).

Changes will remain in memory only, until you decide to write them.
Be careful before using the write command.


Command (m for help): p

Disk /dev/sdb: 8589 MB, 8589934592 bytes, 16777216 sectors
Units = sectors of 1 * 512 = 512 bytes
Sector size (logical/physical): 512 bytes / 512 bytes
I/O size (minimum/optimal): 512 bytes / 512 bytes
Disk label type: dos
Disk identifier: 0x00096659

   Device Boot      Start         End      Blocks   Id  System
/dev/sdb1            2048    12582911     6290432   8e  Linux LVM

Command (m for help): d
Selected partition 1
Partition 1 is deleted

Command (m for help): p

Disk /dev/sdb: 8589 MB, 8589934592 bytes, 16777216 sectors
Units = sectors of 1 * 512 = 512 bytes
Sector size (logical/physical): 512 bytes / 512 bytes
I/O size (minimum/optimal): 512 bytes / 512 bytes
Disk label type: dos
Disk identifier: 0x00096659

   Device Boot      Start         End      Blocks   Id  System

Command (m for help): n
Partition type:
   p   primary (0 primary, 0 extended, 4 free)
   e   extended
Select (default p):
Using default response p
Partition number (1-4, default 1):
First sector (2048-16777215, default 2048):
Using default value 2048
Last sector, +sectors or +size{K,M,G} (2048-16777215, default 16777215):
Using default value 16777215
Partition 1 of type Linux and of size 8 GiB is set

Command (m for help): p

Disk /dev/sdb: 8589 MB, 8589934592 bytes, 16777216 sectors
Units = sectors of 1 * 512 = 512 bytes
Sector size (logical/physical): 512 bytes / 512 bytes
I/O size (minimum/optimal): 512 bytes / 512 bytes
Disk label type: dos
Disk identifier: 0x00096659

   Device Boot      Start         End      Blocks   Id  System
/dev/sdb1            2048    16777215     8387584   83  Linux

Command (m for help): t
Selected partition 1
Hex code (type L to list all codes): 8e
Changed type of partition 'Linux' to 'Linux LVM'

Command (m for help): p

Disk /dev/sdb: 8589 MB, 8589934592 bytes, 16777216 sectors
Units = sectors of 1 * 512 = 512 bytes
Sector size (logical/physical): 512 bytes / 512 bytes
I/O size (minimum/optimal): 512 bytes / 512 bytes
Disk label type: dos
Disk identifier: 0x00096659

   Device Boot      Start         End      Blocks   Id  System
/dev/sdb1            2048    16777215     8387584   8e  Linux LVM

Command (m for help): w
The partition table has been altered!

Calling ioctl() to re-read partition table.

WARNING: Re-reading the partition table failed with error 16: Device or resource busy.
The kernel still uses the old table. The new table will be used at
the next reboot or after you run partprobe(8) or kpartx(8)
Syncing disks.
After that, your new partition /dev/sdb1 should have 8GB. Initially was 6GB.
Our SQL insert still Up.
Now the LVM is not showing the change and our partition is 6GB yet.
[root@test-pp /]# pvs
  PV         VG       Fmt  Attr PSize  PFree
  /dev/sda2  rootvg   lvm2 a--  19.51g    5.43g
  /dev/sdb1  pgdatavg lvm2 a--   6.00g       0
To fix that, we need update the partition with the command partx.
partx -u /dev/sdb
Finally, execute the pvresize command which resize the Physical Volume
[root@test-pp /]# pvresize /dev/sdb1
  Physical volume "/dev/sdb1" changed
  1 physical volume(s) resized / 0 physical volume(s) not resized
[root@test-pp /]# pvs
  PV         VG       Fmt  Attr PSize  PFree
  /dev/sda2  rootvg   lvm2 a--  19.51g    5.43g
  /dev/sdb1  pgdatavg lvm2 a--   8.00g    2.00g
With following command you can resize the FileSystem.
[root@test-pp /]# lvresize -l +100%FREE -r /dev/pgdatavg/pgdatalv
  Size of logical volume pgdatavg/pgdatalv changed from 6.00 GiB (1535 extents) to 8.00 GiB (2047 extents).
  Logical volume pgdatalv successfully resized.
meta-data=/dev/mapper/pgdatavg-pgdatalv isize=256    agcount=4, agsize=392960 blks
         =                       sectsz=512   attr=2, projid32bit=1
         =                       crc=0        finobt=0
data     =                       bsize=4096   blocks=1571840, imaxpct=25
         =                       sunit=0      swidth=0 blks
naming   =version 2              bsize=4096   ascii-ci=0 ftype=0
log      =internal               bsize=4096   blocks=2560, version=2
         =                       sectsz=512   sunit=0 blks, lazy-count=1
realtime =none                   extsz=4096   blocks=0, rtextents=0
data blocks changed from 1571840 to 2096128
[root@test-pp /]# df -h /pgdata/
Filesystem                     Size  Used Avail Use% Mounted on
/dev/mapper/pgdatavg-pgdatalv  8.0G   78M  8.0G   1% /pgdata
Conclusion:
Congratulations, you made a partition resize without downtime.
This guide showed how resize a existing partition in a Virtual Environment with a PostgreSQL database. With this procedure you avoid insert a new disk to Volume Group and keep the quantity of disk per Virtual Machine stable. I hope this guide will help.
Your thoughts and suggestions are always welcome, please feel free to comment or ask questions if you need a hand.